Hello everyone! I thought I would share a First day of school card I made for Jillian. Jillian is one of those kids who really loves to get notes, well I guess all kids do, Zachary loves them too, but Jillian saves them and gets super happy whereas Zachary will see it and not want his friends to see it so he hides them. But secretly he likes it so he will just have to deal with it :)
Anyway, this is a card I made for Jillian. I used some cards from the new Seasonal Snapshots Project Life card pack These are meant for scrapbooking but they are also perfect for cards and the packs come with SO MANY cards that you will have plenty to use on all your projects. The cards are designed to work together and there is a matching accessory pack to you don't have to even think.
To make the card I sorted through the card pack and looked for a couple of cards that worked nicely, then I just adhered them to a card base. The back to school letters are part of the accessory pack. The card was already cute with the apple, no added stamps needed for this one.
The card packs come in a handy box. I love these boxes. I add the accessory pack to the box so that everything is together,
The Seasonal Snapshot 2015 Project Life card collection has cards perfect for all your fall/winter needs. Back to school, Halloween, Thanksgiving, Christmas and winter fun.
100 double sided cards in a great storage box for $16.00. Matching accessory pack is $12. There is a matching stamp set too! You can see this set in the Holiday Catalog that comes out on September 1st! Check out all the Project Life collections in the big Annual Catalog!
Thanks for stopping by!
Wednesday, August 26, 2015
Tuesday, August 25, 2015
Friday, August 21, 2015
Marker Organization
Hello everyone! I found a fun marker storage idea on Pinterest awhile back and after collecting enough supplies from drinking some yummy Crystal Light, I was finally able to make it.
I thought I would share the project with you in case you needed some marker storage as well.
I intend to put them up on a little shelf next to the ink storage. The shelf will have slots for dimentionals and things like rhinestone accents.
The project starts with empty Crystal light containers and some Washi tape. I used 7 containers, one for each color family, both In-Color families, and journaling pens and Sharpies.
You don't really need the Washi tape but it looks funner and I used colors that co-ordinated with the markers, pastel tape with pastel markers and so on.
Next I used a hot glue gun to adhere them together, and added the markers.
There is just enough room to grab the markers from the containers quickly and easily. And they are easy to find! I used to keep them in their original boxes and in a drawer but them I had to pull up the flap and open the box and pull out a marker and put them away and I know that sounds easy but the boxes were on top of each other and I had to look for the right one and blah blah blah. This is just grab and go! Easy Peasy!
What do you think?
Thursday, August 20, 2015
Holiday Catalog Pre-order
Hello everyone! So you may be wondering why I have not posted new projects in a while. Well, it is because I went a little crazy with the Holiday catalog pre-order and my craft room is overflowing. I can't find my table!
I need to spend a couple of days finding room for my new goodies. Luckily the kids started school yesterday and so I will have time to get to work! And, when I am finished, I will be showing you a lot of new products and projects from this really fun and fabulous new catalog!
Do you wish you could have a mountain of new goodies to play with? You can! Join Stampin' Up! as a demonstrator and choose $125 worth of product for just $99! That's it! There is no catch! You can be your only customer, or you can have a few customers, or you can grow a business. It's up to you. If you decide not to make any further purchases, you will simply be dropped from the site after the quarter, but that wont happen because you will love Stampin' Up! for the products, the customer service, the fun and ideas from other demonstrators and more! You will love getting products first and at a discount. Click on the Join my team button under the blog header to be directed to joining instructions. Contact me with any questions, I am happy to help!
Did you know that Stampin' Up! is going to start having mini-convention type events for demonstrators in areas across the country? These are fun opportunities to get together with other stampers and have fun, see new products and get away from household chores :) the next event is in November and there are several locations. The nearest to me is Milwaukee, but there are locations all over the country. This is the first time they are doing this and I am sure it will be special. These events are another great perk of being a demonstrator. I can't afford to go to every Stampin' Up! event but the conventions I have attended in the past, including this July, were a lot of fun and I am sure these mini events will be fun too!
So Join the fun and become a Demonstrator Today!
Wednesday, August 19, 2015
August My Paper Pumpkin
If you did not sigh up, you still have time to sign up, the 50% off deal ends September 10th. And, when you are a My Paper Pumpkin subscriber, you get to order past kits and refills while supplies last.
Feel Free to contact me with any questions
Thursday, August 13, 2015
Vintage leaves
I really love the new Vintage Leaves stamp set. I love the fall, it is my favorite season, so this was one of the first stamps that I bought from the Holiday Catalog.
For this card I wanted to use the English Garden Designer Series Paper, and I wanted a slightly watercolor look, to go with the paper.
I started by inking the stamp up with Old Olive, Mossy Meadow and Early Espresso. I just pressed the stamp into the pads in different areas so that the leaf was multi hued.
Next I used my Aqua Painter filled with Alcohol. (91% variety not the 70% in most medicine cabinets. See this post for details) I keep two sets on Aqua Painters at my desk, one filled with water, one with alcohol. I mark the alcohol painter with an A so I know which one it is, although you can smell it once you open the cap.
I used the Old Olive and Mossy Meadows ink pads to paint the leaves.
I used alcohol to paint the leaves because I wanted to use Whisper White paper and water could start to warp and pill the paper unless you use watercolor paper. The alcohol will allow you to get a water color look without ruining the paper. I painted the leaves imperfectly to get a more hand water colored look. I then cut the leaves out with the Leaflets framelits dies.
I hope that you like my card and that you will give painting with alcohol a try.
Thank you for stopping by!!
Tuesday, August 11, 2015
A few more presents
Hi again! I have some more cards to show you that I made with the "Your Presents" stamp set. We received this set at the Stampin' Up! convention and made the two cards I showed yesterday. Today I thought I would show you some more variations. I love that this set is great for Birthdays as well as Christmas, giving it year round appeal.
This Birthday card is made with Marina Mist and Cucumber Crush.
I cut the presents out and layered them, some popped up with dimentionals. There is some Cucumber Crush Washi Tape under the boxes and some silver thread behind.
Now for some more Christmas...
The "Your Presents" set comes with some simple shapes, such as circles and squares. The squares make great boxes of course, and the circles make great backgrounds as well as ornaments. The set has a fun ornament hanger for the ornaments.
The "Your Presents" stamp set is designed to be used with the "Kissing" technique. This technique is were you press two stamps together to get an impression of one onto another.
Notice the trees in the circle? That comes from kissing the circle stamp with the tree stamp. Fun!
You can also use the bow stamp to make fun little striped circles. They look like starburst mints, don't they?
See that fun plaid! That is the striped stamp stamped twice. Stamp the diagonal stripe one way, then ink it again and stamp rotate 90 degrees to the other way.
inked once!
inked twice!
Here are the circles as ornament, with different patterns made with the kissing technique. The shapes and patterns in the set are really fun to mix and match. you can see this set in the Holiday catalog, coming out on September 1st. I have begun mailing out copies and if you would like to receive one, please contact me to get a copy!
Thanks for stopping by today!!
Monday, August 10, 2015
Loads of Presents!
Hello again everyone. Today I am showing you a card that we made at the Stampin' Up! convention. We were all given the stamp set "Your Presents" at check in, and then at one of the sessions we made some cards and matching envelopes with it. The set is shown in the Holiday catalog as a Christmas set, so I really liked that we used it as a Birthday card.
The colors here are Watermelon Wonder, Crushed Curry and Mint Macaroon.
Next we made a Christmas card with the set. This one used Mint Macaroon and Soft Sky. We also got to use the new Black Archival Ink, and let me tell you, it stamps like a dream. We also used some new ribbon, very fun!
I hung out with my fiend Mindy and we both forgot to bring our blocks to class. Luckily she was quick thinking and we found another use for our cell phones!
Look for this Stampin' Up! set in the upcoming Holiday catalog!!
This week I am actually on vacation with my family but I am scheduling some posts for while I am away! If you have any Questions, please leave me an email and I will get back to you as soon as I get home!
Thanks for stopping by!!
Saturday, August 8, 2015
50% off new My Paper Pumpkin subscriptions
Hello everyone! I thought I would just pop in and remind you that right now you can save 50% off your first two months of My Paper Pumpkin! That's just $10 a month! Get a Craft kit in a box and have everything you need to create fun projects in no time. You can cancel your subscription at any time, so if you want to just try those two discounted months, you can do that! Each month you get a fun stamp set, as well as an ink spot and all the paper and envelopes needed to complete the projects. And, when you are a My Paper Pumpkin subscriber, you can buy past kits and refills for your kit. There is also an online community of ideas to show you alternate ways to use your kit. I like to make up a couple of the projects exactly as they came, and then make up the rest in a completely different way. You can see past months projects here...https://www.pinterest.com/paperpumpkin/
Sign up for My Paper Pumpkin by clicking my link to the right, and enter HALFOFF in the promo code area. Sign up by Aug 10th to get this months kit, as well as September's. If you miss it this months don't worry, promotion ends on September 10th, so you can do the Sept/Oct kits.
Contact me with any questions!
Friday, August 7, 2015
New Goodies!!
Look what the UPS man brought today! Yea! New Stampin' Up! goodies! Don't you just love that wreath? I do!! Stamp Campers, you know we will be doing that one together soon!
Holiday catalogs are going to be arriving in your mail boxes in the coming days and you will be able to see all these goodies close up. And you will be able to order them on September 1st!
Look at the stamps, paper, ribbon! I will be very busy trying to organize my room to fit all the new things!
Expect some sneak peeks in the coming days.
Thanks for stopping by!
Tuesday, August 4, 2015
Stampin' Up! Weekly Deals
Hi everyone! Here are the latest Weekly Deals! And be sure to check out the clearance rack, we were told new items will be added on Wednesday August 5th.
Half Off My Paper Pumpkin
Hi Everyone! If you haven't tried My Paper Pumpkin yet, now it the time. Right now you can get 50% off your first two months! This is for new subscribers with new email addresses only unfortunately. Unless you have a separate email you can use :)
I got a sneak peek at the Stampin' Up! convention and I can tell you that the August kit is very nice, think blacks and pinks, gold accents. 6 cards and 3 gift boxes. Very nice. You would need to be signed up by August 10th to get this kit.
The September kit was very fall and a treat holder. I am going to say that I am happy I get two each month because I will love to give out these treats. The stamps for September have Halloween sayings but fall as well in case you don't do Halloween, and the treat holder is fall looking, not ghosts or witches in case you don't do Halloween. If you like to give out treats you can go in and change your subscription qty to two just for a month. You would need to be signed up by September 10th to get this kit.
I love both of these kits and I think you will too!
And, when you are a My Paper Pumpkin subscriber, you can get past full kits and refills in selected months while supplies last. You can see past kits here. That snowflake fit was really fun, tags and cards, and Christmas is coming fast. And I have bought several refills for that "Filled with love" kit. It had such a great stamp set for Valentines and the bags were adorable and I got a lot of compliments on them. I am all set for next year on that.
Please let me know if you have any questions about My Paper Pumpkin! I am happy to answere your questions.
You can sign up by clicking my My Paper Pumpkin button to the right.
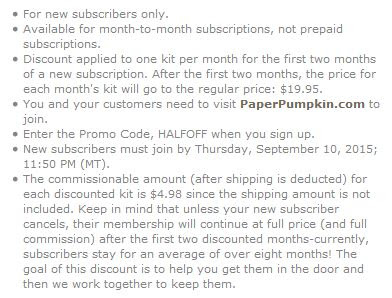
Here are the details for this promotion:
Thanks for stopping by!!
Monday, August 3, 2015
View Finder Card, Buzzing by
Hello everyone. Today I want to share a card we made at our July Stamp Camp. This was a fun one, but it does have lot of steps so stay with me :)
I made a card front from Hello Honey (of course) at 4 by 5 1/4 inches. The card base is Basic Black at 4 1/4 by 5 1/2.
The little flowers are Rose Red with Honey honey centers and Mellow Moss leaves.
I used the Honeycomb Hello Stamp set, they were sized perfectly to fit within the small window cut out.
The first thing you need is the wheel. I used a discontinued die. I had it so I used it, but you can make one on your own with a circle.
To make your own,
cut out a large circle from scratch paper, something thin you can fold. Next fold the circle in half, then in half again and again.
Once you have it folded, carefully clip the corners of the thin pie piece. When you open it, it will look like this, with nice little notches that make turning the wheel easy. This will be your template for the actual circle for your card.
Now punch another circle out of thicker cardstock. I used the NEW Thick Whisper White card stock, it is perfect for pulls and tabs and things that will get touched a lot. Use the template you just made to add the notches to your thick circle. Now you need to make yet another circle out of a window sheet or some acetate, something you can see through. This clear circle is just to help you place your stamps. I did make one with out the clear circle as a guide and it just didn't work as well and so I think having the template is worth the extra step.
I used the honeycomb embossing folder for my card, and that has the added step of figuring out which of the hexagons to cut out for your window. The clear template is perfect for this. You want to make sure the wheel extends slightly past the front panel.
I used an Exacto knife to cut it out.
Use a circle punch to cut out a small area for the wheel. Hold the front panel over the card base to also punch the circle through the card base. Don't glue it down, just hold them together for now.
Now that you have your notches and your window you can place your wheel behind the window. Use a hole punch or paper piercing needle to add a hole for your brad. Adhere the wheel with the brad. Then add dimentionals behind the card front to give it a little wiggle room to spin. Now you can attache it to your card base.
Now you can decorate the card front any way you like.
I made a bee out of the large oval punch and some scraps of basic black card stock. I punched out the oval, then added strips and put it through the punch again.
I made a stinger with the tip of a star. I added the face with my basic black marker.
The wings are the heart punch and vellum card stock. I cut a small slit in the heart between the two humps, and then folded them to over lap slightly. Then I added a line of glue with the two way glue pen.
I then dipped the tips of the wings into my Dazzling Diamonds glitter.
Yea, pretty wings.
I made my sentiment on my computer. You can really personalize a card this way and I think we often forget that. We are always looking for the perfect stamp and sometimes just can't find the right sentiment. Admittedly I use a stamped sentiment 99% of the time, but don't forget to be creative here as well. I printed the sentiment out on Whisper White card stock and used framelits to cut it out. Here is a video of the card in action!
Subscribe to:
Posts (Atom)