Hello everyone! here are the new Weekly Deals from Stampin' Up! But, even better than the weekly deals is the Year End Close Out going on now. The Year End deals end on January 4th so be sure to check them out!
It's not a Stampin' Up! card but I thought I would share it anyway because it is crafty :) and a card :)
and I worked hard on it and so I thought why not?
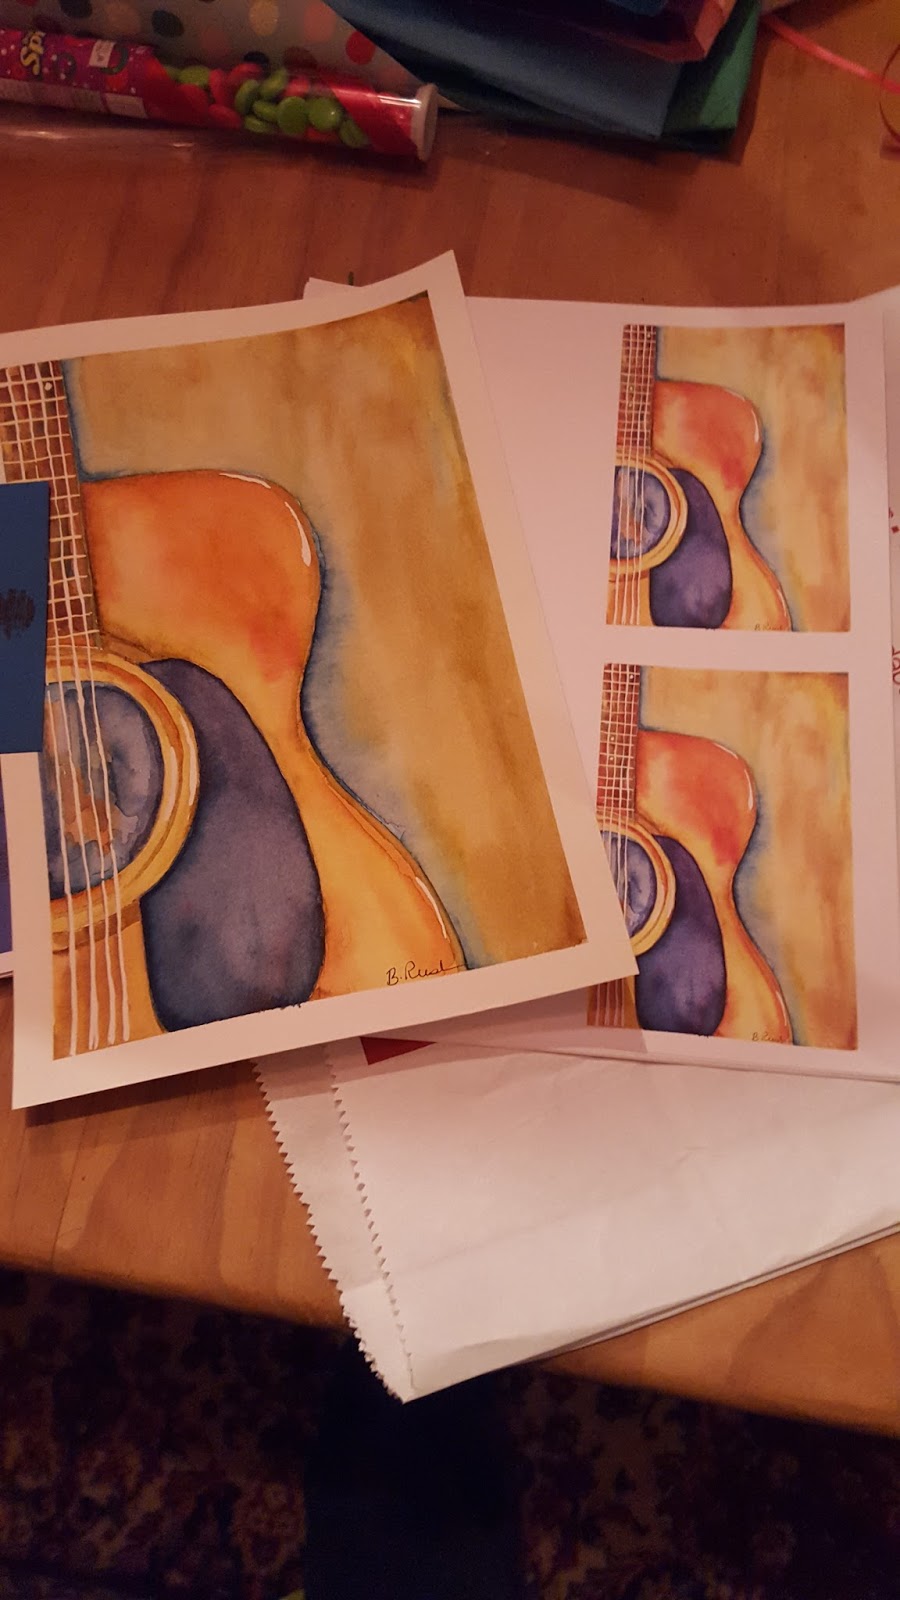
I drew this guitar last year for a friend's birthday but never painted it because I was just too nervous to do it. I had an idea of what I wanted and didn't want to mess up, then it got too late and I set it aside. This year I decided to do it because really it's just paper and if I mess it up I lost what? $0.80? silly to worry about that.
I saw a watercolor painting like this on Pinterest and thought it was really fun, but I am not a guitar person and may have messed up some technical things, like where the frets actually are or how they are spaced, but it is a stylized guitar so it's OK right?
I paint with my aqua painter and ink, so I guess in a way it is a Stampin' Up! project!
Look at my desk!!! This is what happens when it gets close to Christmas! When ever I do a huge room clean up I tell myself that I am going to clean completely after each project, but I never do. When will I learn to clean as I go?
Once I was done I scanned the painting and then printed it out onto thick white cardstock, another Stampin' Up! product see!
Then I cut them cardstock in half and scored and folded, and put the cards into a cello bag with envelopes and a bow. I also framed the original and will wrap them up together for my guitar loving friend.
I thought I would highlight a couple fun items from the current Year End Holiday close outs. One of my favorite finds is the super cute Real Red Pom Pom trim! I saw my friend Cindy Schuster use it as holly berries a few weeks back, and I just had to do that too! I also saw a cute project on Pinterest by Connie Collins that used the Sweetie Pie boxes as trees and I really pretty much just copied her box, too cute! She had some really pretty ribbon that I did not have but that's OK.
Isn't that pom pom so cute there?
The Holly leaves were made with an oval punch. Fold the oval in half and then punch half circles out of the sides.
I also made this cute little box, also inspired by Cindy Schuster. I used a bigger oval for this holly.
The little box is made from the gift box punch board. This box used the 6 x 6 Merry Moments paper stack. You don't even need to trim the paper first, so you can make lots of little boxes super fast. Fill with some little gifts like chocolates or other small things, like what my nephews want, cash :)
And my favorite use of the pom pom trim is for a Rudolph nose! So much fun! The reindeer paper clips are on sale, as is the 6 x 6 paper stack, and the pom pom trim!!
What else will you find on sale at the Year End Close out?!
Simple but cute! And as time is running out, simple is what's needed!
Hello everyone! I thought I would share the cards and gift bag I made for Jillian's Ballet class. I made these projects with the soon to be retired Sparkly Season stamp set.
I bought this stamp set right away with ballet class in mind, but I have since used it for Halloween and I will be making some nutcracker cards in the future I am sure.
I adhered my tag to a Petite Cafe Bag. I love this cute little bags. Inside is a gift card as well as a bunch of hair bands ( the class is constantly forgetting to put their hair into a ponytail for class and the teacher has a jar of them on her desk, which gets empty fast, so I am helping to replenish the supply) and some chocolate.
Did you catch the new product? Blushing Bride Glimmer paper!! and let me tell you, it is so gorgeous in real life!! It will be available in the new spring mini catalog that starts January 5th!
Here is a card version I made when I thought I was just going to give a gift card.
inside the snow globes are some sequin stars and some "snow" left over from the To You and Yours shaker card kits.
Well it has been a while since I last posted hasn't it? This time of year is so busy for everyone and I have been getting all set for Christmas. I am actually all set presents wise, this is a record for me! I am usually last minute. However I have not yet finished addressing and sending my cards!! Yikes! I got all "wrapped" up getting my packages sent to out of town family and I have even wrapped and hidden all the presents for this house as well! The past couple of days I have been working of some small gift bags and I thought I would share them with you. I know it is a little late for you to be purchasing supplies to make Christmas gifts but, perhaps this will give you some ideas for next year! or you can take the idea and adapt it for Valentine's Day. I made the bags with the Gift Bag Punch board! The Gift Bag punch board makes this project so fast and easy. I made 8 of these this afternoon. I used tags from the Oh What Fun tag kit. The tag kit makes 30 tags and is currently on sale for $14.70. The stamp set that works with the tag kit is sold separately but I think it would be simple to make similar varieties with some Christmas stamps you may have already, or you could pick up the Oh what fun stamp set for $21, it is a great Christmas set to have on hand.
This size bag uses one sheet of 8 1/2 by 11 cardstock. The directions for the bag are printed directly on the punch board so you can't go wrong.
The Board makes a bag with ribbon handles at the top, but I altered it slightly to make a flap at the top. I simple punch a flap using the same punch that makes the bottom flaps, then trim an inch and a half off the top, leaving the flap. I then use the hole punch on the board to make holes for my ribbon.
Here is what my finished bag looks like flat.
I then mock fold my bag without adhesives to line up the holes and mark them with a pencil. Then I use a hand held hole punch to make holes on the inside of the bag to make the closure.
The bag is big enough to hold a gift card, and some small items. This one is going to my niece, so it has a gift card to a store she likes, as well as green nail polish, her school color. She is a freshman on the varsity gymnastics team this year! Go Sydney! I also threw in a couple tinted lip glosses and some chocolates.
Here it is all closed up.
Now is a great time to take a look at the year end close out sale. There are some great holiday products on sale that you will really want next year! Check out the Holiday Fancy Vellum, this is really great and on sale. The Real Red and Garden Green striped ribbon is a great deal too! head over to the online store and check out the deals!
Stampin' Up! is having its Year-End Sale! Now is a great time to get deals on retiring holiday products and other clearance items. Quantities are while supplies last so act now.
Please feel free to contact me with any questions.
Hello Everyone! The new Weekly Deals are here and one of them is one you should be getting, in my opinion at least. It's the precision base plate. I held off on this for a long tie, thinking I didn't need it, but I have since been able to play with someone else's and decided to get it. The clear acrylic plates are fine, but for lots of detail this is better. The dies can't cut into this plate as they do the clear ones, and you get a crisper cute because you are not cutting on top of all those past cut marks that have left divots in your plate. Well my buying it at full price has opened the door for you to get it on sale. That seems to be how it goes sometimes isn't it :)
Here are the deals...
Hello my Stampin' Friends! It has been a WEEK since my last post and I thought I would share what I was doing, even though it is not really a stamping project. I was tasked to buy commemorative ornaments for the kids who will are singing in the Christmas program at our church. They have a dress rehearsal next Saturday and we usually do a little party afterwards. They get some pizza and decorate some cupcakes and then get a goodie bag with an ornament. This year I and another mom were asked to handle the party and come up with an ornament. Well, me being me, I had to make the task harder by making the ornaments. I wanted to keep costs down, since I had to get a lot of them, and I wanted the ornaments to reflect the kids and singing in some way. I didn't find any I liked and while looking on Pinterest I found some cute carolers, but they were bigger, made from toilet paper rolls, and they had knit hats, made from baby socks. I thought about how to make them smaller and cheaper and I came up with this. I think they are cute! I used clothes pins, which were so easy to paint and came in a pack of 40 for just a few dollars. I had paint in my craft stash so that was easy. Sharpie pen for the face and some felt and ribbon for hats and scarves. The scarves are old Stampin' Up! ribbon from a couple Christmases ago or you could use some yarn. The hats are made of felt.
The little song books were made on my computer, printed out and glued together.
I cut out felt circles and divided them into threes. I added glue to one side and rolled them into cones. I secured them with tiny clips until they dried.
I added a tiny pom pom to the end of the hat. I also added a bit of cord to the hat so that it can be hung onto a tree.
I used a hot glue gun to add the books to the bodies. The little carolers don't have hands :) They looked really cute, all 30 of them singing on my dining room table. My daughter Jillian came hone and saw them and was super excited, thinking that I had made her a whole choir of her own to play with.
So, not a paper craft but I thought I would share since you are all crafty people as well!