

Hello everyone. Today I want to share a card we made at our July Stamp Camp. This was a fun one, but it does have lot of steps so stay with me :)
I made a card front from Hello Honey (of course) at 4 by 5 1/4 inches. The card base is Basic Black at 4 1/4 by 5 1/2.
The little flowers are Rose Red with Honey honey centers and Mellow Moss leaves.
I used the Honeycomb Hello Stamp set, they were sized perfectly to fit within the small window cut out.

The first thing you need is the wheel. I used a discontinued die. I had it so I used it, but you can make one on your own with a circle.

To make your own,
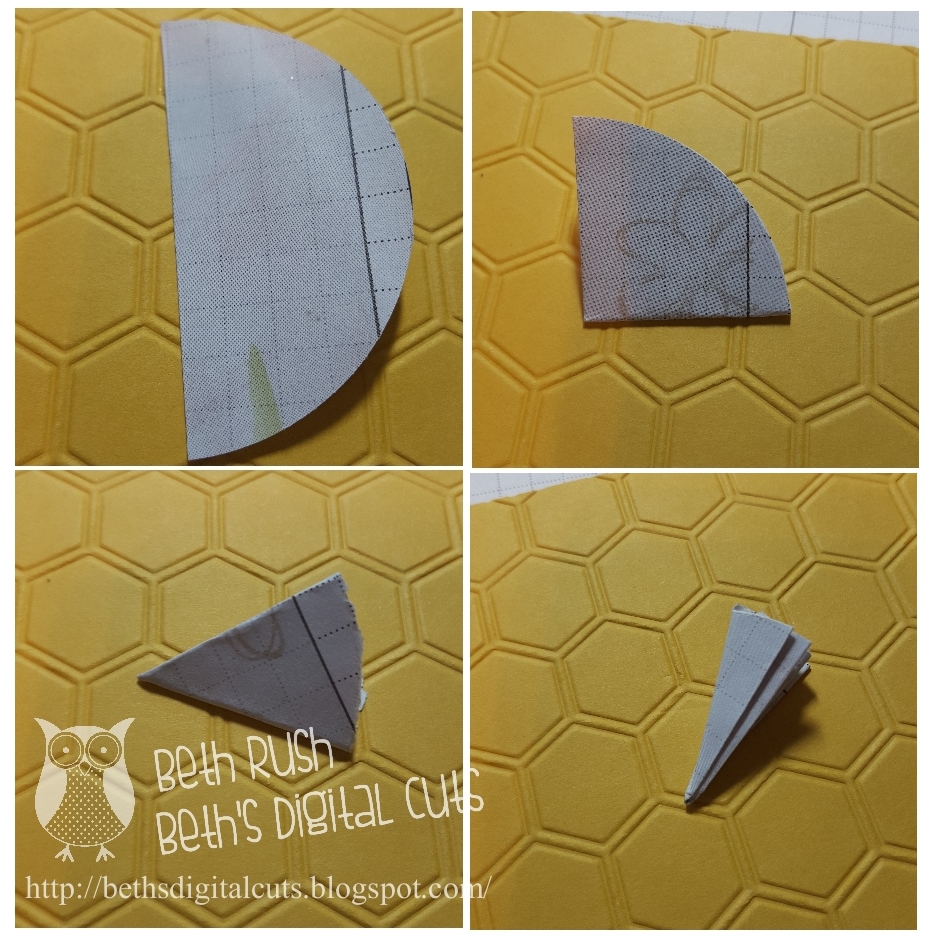
cut out a large circle from scratch paper, something thin you can fold. Next fold the circle in half, then in half again and again.

Once you have it folded, carefully clip the corners of the thin pie piece. When you open it, it will look like this, with nice little notches that make turning the wheel easy. This will be your template for the actual circle for your card.
Now punch another circle out of thicker cardstock. I used the NEW Thick Whisper White card stock, it is perfect for pulls and tabs and things that will get touched a lot. Use the template you just made to add the notches to your thick circle. Now you need to make yet another circle out of a window sheet or some acetate, something you can see through. This clear circle is just to help you place your stamps. I did make one with out the clear circle as a guide and it just didn't work as well and so I think having the template is worth the extra step.


I used the honeycomb embossing folder for my card, and that has the added step of figuring out which of the hexagons to cut out for your window. The clear template is perfect for this. You want to make sure the wheel extends slightly past the front panel.
I used an Exacto knife to cut it out.


Use a circle punch to cut out a small area for the wheel. Hold the front panel over the card base to also punch the circle through the card base. Don't glue it down, just hold them together for now.

 Now that you have your notches and your window you can place your wheel behind the window. Use a hole punch or paper piercing needle to add a hole for your brad. Adhere the wheel with the brad. Then add dimentionals behind the card front to give it a little wiggle room to spin. Now you can attache it to your card base.
 Now you can decorate the card front any way you like.
I made a bee out of the large oval punch and some scraps of basic black card stock. I punched out the oval, then added strips and put it through the punch again.

I made a stinger with the tip of a star. I added the face with my basic black marker.

The wings are the heart punch and vellum card stock. I cut a small slit in the heart between the two humps, and then folded them to over lap slightly. Then I added a line of glue with the two way glue pen.

I then dipped the tips of the wings into my Dazzling Diamonds glitter.

Yea, pretty wings.

I made my sentiment on my computer. You can really personalize a card this way and I think we often forget that. We are always looking for the perfect stamp and sometimes just can't find the right sentiment. Admittedly I use a stamped sentiment 99% of the time, but don't forget to be creative here as well. I printed the sentiment out on Whisper White card stock and used framelits to cut it out. Here is a video of the card in action!


Really great card. Thanks for sharing!
ReplyDeleteSo glad you liked it! It was a fun one!
ReplyDeleteCool! I like this a lot.
ReplyDelete