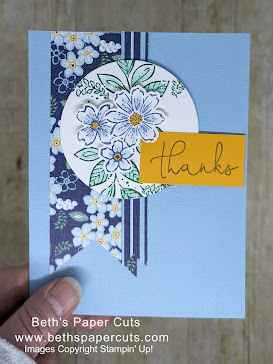
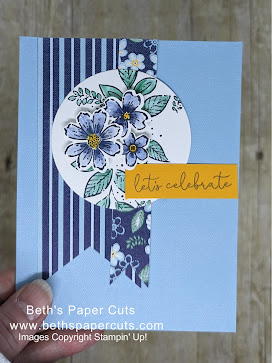
Today I want to share some cards I made using my Blender Pens. I thought I would show a few different ways that you can use the pens.
If you are unfamiliar with Blender Pens, they are a clear marker type pen, filled with some sort of solvent solution that blends ink. It's important to note that Stampin' Up! Blender Pens are acid free and xylene free, unlike other pens on the market. Yay! They are sold in a set of 3 for $12 (as of March 2023). They are dual tip pens, both ends the same, giving you 6 pen tips for $12 or $2 each! You can use them with many mediums, ink, watercolor pencil, pastels, to sort of paint with. One benefit is that if you can a set of blender pens, it's like having a marker in all the colors of you ink pad collection. As you use the Blender Pens, you simple swipe away any remaining ink or color left on the pen tip on a scrap of paper and then you are free to use the pen again with another color. I usually just take one pen out of the box and use it until I dries, well longer than a year. Some people like to designate pens for certain colors, a reds pen, a blues pen, etc. I made a video to show how to use the pens below.
Here are some cards I made with Blender Pens in a variety of ways.
First up is the easiest way to use the pens. I stamped the images in Stampin' Up! classic ink, which is water-based. I then used the Blender pens to spread the ink that had been stamped onto the paper. In this case I stamped flowers, so I used the pens to smear the ink in the petal and leaves, I worked carefully on the flower petals to blend from the flower center outward, so the petals are darker in the center and get lighter going outward. Color your images right after stamping so that the ink is not too dry to blend. This method gives a very light and softly colored look.
This next method used the Blender Pens much like a marker, but you pull ink from the lid of your ink pad, or from a pallet made with your ink refills, and then apply it to your image. First stamp your image in Black, then apply your color with the Blender Pens.
Why not just use a marker you say? Well a marker is a solid color, but with a Blender pen you can get darks and lights. Notice the flowers on the sample. The flower centers are a darker blue that gets lighter to the edges of the petals. If I had used a standard marker I could only get one color value. I show this in detain in the video above. Yes you can get different color values with Stampin' Blends Alcohol markers but the big difference is you can use the Blender Pens with any color but with Stampin' Blends Alcohol markers you need to buy each color and shade separately, wereas I was able to get several shades of navy with just one Blender Pen and my Night of Navy ink pad.
This last version used Watercolor Colored Pencils to get the color. I stamped the images in Black ink, then colored them in using Stampin' Up! Watercolor Colored Pencils. Using the Blender Pens on top of the already colored in images softens your coloring, getting rid of any harsh pencil lines. When blending be careful not to blend out your darks and lights, but if you do, you can apply more pencil on top. You can also blend multiple colors of pencil together to get nice ombre effects. One thing to look out for is paper pilling if you go over an area too much. Cheaper paper will pill faster, or any paper if you go over one area too much. Have a little coloring party and just try it out a few times for fun before coloring your final image. Blender Pens give a very pretty effect and can be really enjoyable to work with.
Product List

.jpg)


No comments:
Post a Comment
Hi, I love all your comments! But, I have learned that I can not always reply to your comments. If you would like me to contact you directly, you can email me at bethrush@issinternet.com Im happy to hear from you. Or, you can leave a comment here if you dont want to hear back. Happy stamping!